In this activity, school aged kids use acrylic paint and leaves to learn how the element “Tint” is used in art. We’ve included a free printable to make teaching this project easy for both the home and classroom.

What is the element of “tint” in art?
When artists tint a color in art, they are simply adding white to the original color. For example, mixing white and red will create a pink tint.
Tint is a very important element in color theory for artists. With this project, kids will better understand how to use their supplies to create more tints of a single color. Being able to create more tints allows artists to use fewer supplies and create more depth to their artwork.
Related: For older students, consider our Tint Posterization Art Project
Supplies Needed to Make this Tint – Leaf Printing Art Project

- Acrylic Paint – both white and a darker color
- White Cardstock
- Leaves – to make leaf prints
- Tint Scale Worksheet printed on Cardstock – Free Download Below
- Paintbrushes
- Water
- Paper Towels
- Washi Tape – used to create a border
- 2 Disposable Plates – For a paint palette and leaf painting area
- Optional: Gloves – for kids that do not like to get paint on their hands
Download the Free Tint Scale Printable Here
Print this handout on cardstock to use at home or in the classroom for kids to understand values of tint. Kids will paint one end of the chart with a solid color and slowly add white as they work across the chart. This activity helps kids see how white alters paint colors before beginning the leaf project.
Directions to Make This Leaf printing Art Project
Step 1

Add both the colored paint and white paint to a paint palette. We want to use these 2 colors to create 3 tints by mixing them together.
Start by painting the solid color in the first box. Kids will then add small amounts of white to their colored paint as they move across the chart. Each box should progressively become lighter as they continue across the chart.
With the chart complete, kids can see the various tints they created by simply adding white to another color.
Place chart aside to dry.
Step 2

Use washi tape to create a border on the paper. If you don’t have washi tape, other tapes will work, but stick them to your clothes a few times first. Doing so will make them less sticky. If the tape is too sticky, it can damage the paper.
Step 3

Next, paint the entire page with the unaltered color that was painted in the first box on the tint chart.
Step 4

Keeping the chart in mind, kids once again add white to the original color to create a lighter tint. Using the now lighter tint, kids paint the back or underside of a leaf. Be sure kids paint the back of the leaf where the veins are more pronounced. Have kids do this on a disposable plate or another well protected surface.
Once the back of the leaf is painted, press the leaf onto the page to create a print. Make a few prints of this leaf and color on the page.
Step 5

Continue creating lighter tints of paint and printing leaves to create different layers on the page. Each layer should get lighter as more white paint is added.
Leaves can get worn out from this printing process. If this happens, simply discard that leaf and exchange for a new one.
Set aside to dry.
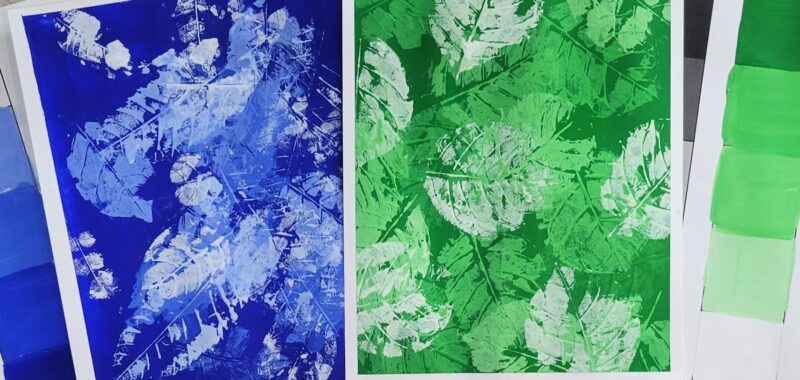
Finished Leaf Printing Art Project

I just love how these acrylic leaf prints turn out. It’s interesting to see the various tints that are created within this project. Since these are created on paper, they can easily be framed, mounted on the refrigerator, or displayed using your favorite method.
Our Experience Making this Leaf Printing Art Project
Kids enjoy this fun, and a bit messy, project as it combines learning a new art element while using nature. I think this project is perfect for spring and summer months. The dry, brittle leaves of fall could crumble too easily for the repetitive printing process.
Tint Project Variations
- Consider using mixed media paper or canvas for the leaf printing portion of this activity.
- Incorporate a science lesson into this project by identifying trees and their leaves.
- Find other objects to use for printing. This is a great opportunity to repurpose items that would generally be discarded.
Prep Time
5 minutes
Active Time
20 minutes
Total Time
5 minutes
Difficulty
Medium
Estimated Cost
$5
Materials
- Acrylic Paint – both white, and a darker color
- White Cardstock
- Leaves – to make leaf prints
- Optional: “Tint” Worksheet printed on Cardstock – Free Download Below
- Washi Tape
Tools
- Paintbrushes
- Water
- Paper Towels
- 2 Disposable Plates – For a paint palette and leaf painting area
- Optional: Gloves – for kids that do not like to get paint on their hands
Instructions
- Paint the first square on the printable tint chart with a single dark color. Without contaminating all of the paint, add a bit of white to the outer edge of the original color. Then, paint the next square on the chart. Kids continue adding white as they move across the chart. When complete, set chart aside to dry.
- Use washi tape to create a border on a clean sheet of cardstock.
- Paint the entire page with the original unaltered color.
- Keeping the chart in mind, use a lighter tint to paint the backside of a leaf. This color should be similar to the second box on the tint scale. Press the leaf onto the page to create a print. Make a few prints of this leaf on the page.
- Continue creating lighter tints of paint and printing leaves to create layers of leaves on the page. Each layer should progressively get lighter as more white paint is added.
More fun leaf and acrylic ideas from Kids Activities Blog
Did your kids enjoy this leaf printing activity? What color paint did they choose to use?