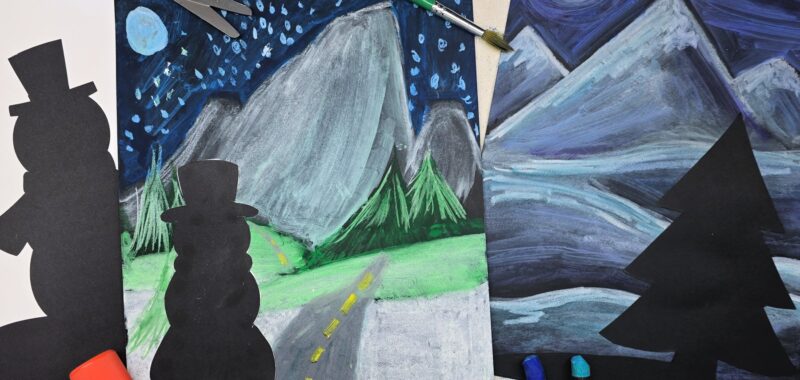
School-aged kids will learn to blend oil pastels in this winter project. We’ve included a free printable making this lesson easy for home or classroom use.

Blending with Oil Pastels
There are many mediums and techniques one can use to blend oil pastels. For this lesson, we will blend oil pastels with odorless mineral spirits. I like how this technique allows the pastels to flow more freely and it dries fairly quickly. Please remember to use a well ventilated area when working with mineral spirits.
Related – Practice blending by layering colors in our Ghostly Overlapping oil pastel project.
Supplies Needed to Make a winter silhouette Art Project

- Winter Silhouettes (Free Download Below) – printed on cardstock
- Black Cardstock
- Oil Pastels
- Odorless Mineral Spirits – and a well ventilated area
- Paintbrush
- Glue
- Scissors
Download the Winter Silhouette Printable Here
Print our free silhouettes on cardstock for an easy to cut winter scene.
Directions to Make a winter silhouette
Step 1

First, use a light colored oil pastel to draw a moon and mountain outline on the black cardstock.
Step 2

Using the same oil pastel, add highlights to the mountainside. Highlights should be on the same side of the mountains that the moon is located.
Step 3

Use oil pastels to add more landscape features into your winter scene.
Step 4

Next, use a paintbrush with a small amount of mineral spirits to paint over the oil pastels and create a blending effect.
Step 5

Then, color shadows using a darker oil pastel. Blending as necessary with the mineral spirits.
Step 6

Add light colored oil pastels to create more intense highlights. Continue to layer and blend as necessary.
Step 7

Next, use scissors to cut the silhouette from cardstock and glue over winter scene.
Finished Winter Silhouette Art Project

I love how these pastel pieces look! These winter silhouettes can easily be framed, clipped, or displayed in your preferred style along with your seasonal decorations.
Our Experience Making this winter silhouette Art Project
I’m grateful to have explored this lesson plan using oil pastels. I will quickly admit that oil pastels are not my favorite medium, but this project reminded me of just how versatile they really are. I love being able to work with the pastels in a paint-like manner by adding the mineral spirits. The clean-up and application of pastels is much easier than actual oil paints, making them a more suitable medium for my classroom.
Prep Time
5 minutes
Active Time
30 minutes
Total Time
35 minutes
Difficulty
Medium
Estimated Cost
$1
Materials
- Winter Silhouettes (Free Download) – printed on cardstock
- Black Cardstock
Tools
- Oil Pastels
- Odorless Mineral Spirits – and a well ventilated area
- Paintbrush
- Glue
- Scissors
Instructions
- Use a light colored oil pastel to draw a moon and mountain outline on the black cardstock.
- Using the same oil pastel, add highlights to the mountainside. Highlights should be on the same side of the mountains that the moon is located.
- Add more landscape features into your winter scene using oil pastels.
- Use a paintbrush with a small amount of mineral spirits to paint over the oil pastels and create a blending effect.
- Color shadows using a darker oil pastel. Blending as necessary with the mineral spirits.
- Add light colored oil pastels to create more intense highlights. Continue to layer and blend as necessary.
- Cut the silhouette from cardstock and glue over winter scene.
Notes
Winter Silhouette Art Variations
- Kids can design and cut their own winter silhouettes from black cardstock.
- Use other mediums such as chalk pastels or acrylic paints to create a winter silhouette.
- Alter project to fit any season or holiday.
Winter Silhouette Art Variations
- Kids can design and cut their own winter silhouettes from black cardstock.
- Use other mediums such as chalk pastels or acrylic paints to create a winter silhouette.
- Alter project to fit any season or holiday.
Other Fun winter Art Projects from Kids Activities Blog
Did your kids enjoy bending oil pastels with mineral spirits? What sort of winter scene did they create?

