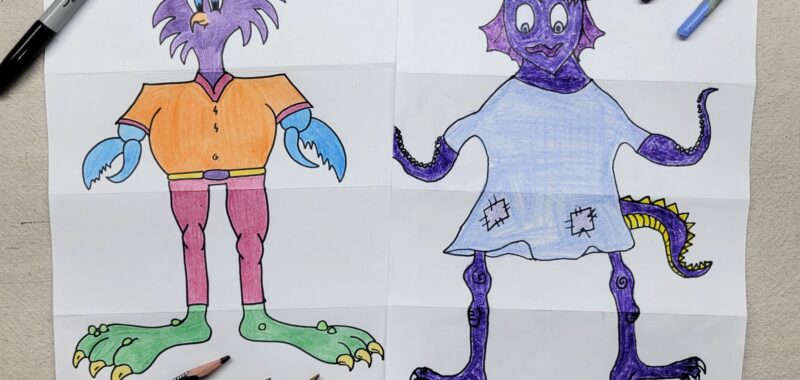
Two or more kids work together to create collaborative drawings of monsters. This mess-free project uses few supplies and is easy to complete at home or in the classroom.

Drawing monsters as a group
This project gives kids a chance to work together on a project while still expressing their individuality. Each kid leaves the project with a completed âmonsterâ of their own.
Related Link – Younger kids may enjoy these free printable monster coloring pages.
Supplies Needed to Make this Complete-the-Monster Art Project

- Paper – one for each artist
- Pencil – one for each artist
- Coloring Medium – crayons, colored pencils, markers, etc.
- Optional: Timer
Directions to Make a Complete-the-Monster Group Art Project
Step 1

Begin by holding the paper vertically. Each kid folds their piece of paper in half to create a horizontal crease. Unfold.Â
Step 2

Next, fold the bottom of the page up to the crease line created in step 1.Â
Step 3

Taking the folded section of the page, fold flap up again, and again. Crease the paper with each fold. The paper should now be folded into 4 sections. Unroll.
Step 4

Starting in the bottom section of their page, have kids draw âfeetâ for a monster. The drawing is confined to this one section and the lines leading to the âlegsâ should barely hang over the crease line. This will give the next artist a starting point for their portion of the monster drawing.Â
Optional: Set a time limit for each drawing session.
Step 5

Once the drawing for that section is complete, have kids fold the flap backwards where it can not be seen. Pass to the page to the next person.Â
Tip: If doing this activity with a large group, kids may need to write their names on their paper prior to swapping.Â
Step 6

Without looking at the previous section, kids draw the “legs” portion of the monster. Again, barely drawing guidelines over the edge of the crease. Fold completed section towards the back and out of view.
Step 7

Kids will cycle through drawing, folding, and passing the page among themselves until the 4 monster sections (feet, legs, body, head) are drawn.
Step 8

Finally, the completed drawing gets unfolded and returned to the person that originally drew the feet. Kids color their own monsters with any medium they choose.Â
Finished Complete-the-Monster Group Art Project

I love how fun and creative this project is! It’s great to see kids working together without any pressures of perfection. I also like that each kid gets to leave with a completed project that multiple kids helped create. Since these projects are made on paper, they are easily framed, clipped, or displayed in your preferred style.
Our Experience Making this Complete-the-Monster Group Art Project
This is such a fun and easy project. I generally leave this as a lesson for my substitute teacher because it is easy to do and can be completed multiple times to fill class time. Simply swap the kid groups and repeat the steps. Each monster still turns out unique!
Prep Time
5 minutes
Active Time
20 minutes
Total Time
25 minutes
Difficulty
Medium
Estimated Cost
$1
Materials
- Paper â one for each child
Tools
- Pencil â one for each child
- Coloring Medium â crayons, colored pencils, markers, etc.
- Optional: Timer
Instructions
- Holding the paper vertically, fold paper in half, creating a horizontal crease. Unfold.
- Fold the bottom of the page up to the crease line created in step 1.
- Taking the folded section of the page, fold flap up again, and again. Crease the paper with each fold. The paper should now be folded into 4 sections. Unroll.
- Draw “feet” for a monster in the bottom section of the page. The drawing is confined to this one section and the lines leading to the “legs” should barely hang over the crease line to give the next artist a starting point. Optional: Set a time limit for each drawing session.
- Once the drawing for that section is complete, fold the flap backwards where it can not be seen. Pass to the page to the next kid.
- Without looking at the previous section, kids draw the “legs” portion of the monster. Again, barely drawing guidelines over the edge of the crease. Fold completed section towards the back and out of view.
- Cycle through drawing, folding, and passing the page among kids until the 4 monster sections (feet, legs, body, head) are drawn.
- Completed drawing gets unfolded and returned to the person that drew the feet. Color.
Notes
Complete-the-Monster Art Variations
- Have kids create other types of creature mash-ups.
- Challenge kids to only draw with their non-dominant hand.
- Give the kids a holiday or seasonal theme to follow.
Complete-the-Monster Art Variations
- Have kids create other types of creature mash-ups.
- Challenge kids to only draw with their non-dominant hand.
- Give the kids a holiday or seasonal theme to follow.Â
Other Fun Monster Art Projects from Kids Activities Blog
Did your kids like their completed monster? What was their favorite part of this activity?

