I love popsicle stick art. Among all the crafting supplies, I feel like popsicle sticks are under utilized, which is why this decorative popsicle stick art project is so awesome! Kids of all ages will love making this camping themed stick art using paints, popsicle sticks, and twine. You can make this camping themed wall decoration at home or in the classroom.

Camping Themed Popsicle Stick Art
This craft can be done by both younger children and older children, however, the results will very depending on the child’s skill level. Either way this popsicle art is fun to make and great fine motor skills practice.
The cool thing is, once you’re finished making this super fun popsicle art you can easily add string or twine and make a super cool wall hanger!
This post contains affiliate links.
Related: We have even more popsicle stick craft for you to try.
Supplies Needed To Make This Lovely Popsicle Stick Art
Step 1

Grab your popsicle stick and add a dab of glue.

Add one of your popsicle sticks, but do not line it up. Do this for a second.

You’ll continue until your vertical popsicle stick is covered with off centered alternating popsicle sticks. Let it dry.
Step 2

Flip your “canvas” over and glue two more popsicle sticks to the top.
Step 3

Paint dark blue paint at the top.

Moving fast paint regular blue beneath it, making sure you blend.
Step 4

Now using purple paint, blend the blue and purple paint and add more purple paint further down.

Do the same with the pink paint. You should have 3 blank popsicle sticks when you’re done.
Step 5

Paint the remaining 3 popsicle sticks black.
Step 6

Now time to add background trees. Paint a line.

Dab paint at the top and move down just dabbing black paint to form your tree. You’ll be making a cone shape.
Step 7

Do this from left to right of your canvas covering the entire horizon in small trees. Allow the black paint to dry.
Step 8

Now draw 4 long vertical lines from the top to bottom using black paint. You can do 3 on the left side and 1 of the left side or vice versa, it’s your painting.
Step 9

Start adding some leaves by dabbing the black paint.

Draw some branches.

Add more leaves until your trees look good to you.

Do this for the other side as well.
Step 10

Let’s draw the tent. Using a lighter gray make a triangle.

Now add two lines and a diagonal using a darker gray.

Paint in the majority of the tent with a darker gray and the the triangle with a lighter gray. Make a black line down the triangle.
Step 11

Fire time! Dab red paint onto your popsicle stick canvas.

Now dab orange over the red.

Use yellow to dab over the orange.
Repeat 1 more time.
Step 12
Let’s add some highlights. Using orange and a little yellow, paint down each side of the large trees facing the fire. Drag your fingers down to smudge it and make it less opaque.
It’s time to add highlights around the fire and tent now. Paint a little orange all around the fire. Smudge with your finger to make it less opaque. Now do it for the horizon around the fire. Make sure you smudge! Add some streaks on the front of the tent and smudge those as well.
Step 13

Add a very light layer of white paint to a paint brush. Flick the white paint onto the sky. Once the paint brush is almost dry, gently dab the tips of the bristles onto areas between the trees.
Craft Notes:
If you get white specs on areas you don’t want, you can easily cover it up with a little paint.
Step 14
While your painting is drying, cut about 10-12 inches of twine.
Step 15
Flip your painting over when dry and hot glue about 1/2-1 inch of twine to the popsicle stick on the sides.
Step 16

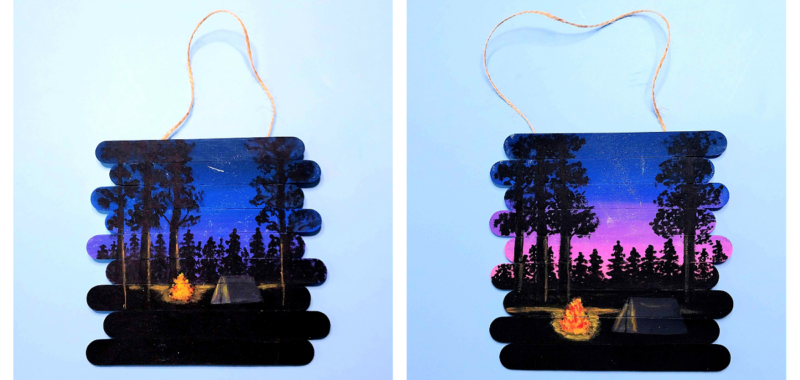
Hang on your wall and admire your art!
Make This Camping Themed Popsicle Stick Craft Your Own

This is your craft, as such make it your own. You can make so many changes to make this popsicle stick painting your own like:
- Changing the background colors. You can use blacks and blues. Oranges, yellows, and reds.
- Add more trees.
- Add less trees.
- Make more camping gear around the camp site.
- Add people around your campsite.
- You can add a moon.
- Use glitter for stars.
- Add glitter to your fire.
- Instead of using jumbo popsicle sticks for this fun craft project you can use regular ice cream sticks.
There are so many cute ideas and many fun ways to make simple popsicle stick crafts.
Our Experience Making This Super Neat Popsicle Stick Art

Again, the inspiration for this piece of art was camping. But I wanted us to be able to make something more permanent. A decoration or a keepsake to give to a grandparent. So I thought wall art would be great. And it’s a great craft that my older kids and young kids can both do. Though the end result will look different for bigger kids then say preschoolers. But it’s all amazing artwork in the end.
We loved exploring the different colors and exploring highlights and shadows. I was just looking for easy popsicle stick crafts and in the end we got to explore different aspects of art.
I love when fun activities and easy ideas end up with more lessons then one. And as I said before, I feel like craft sticks get slept on. They’re so versatile and you can get them at the dollar store. We hope you enjoy these fun popsicle stick crafts as much as we did. We had so much fun!
Materials
- Acrylic Paint (We used pink, purple, blue, black, orange, red, yellow)
- Paintbrushes
- Popsicle Sticks
- Elmer’s Glue
- Hot Glue Gun
- Twine
- Scissors
Instructions
- Grab your popsicle stick and add a dab of glue.
- Add one of your popsicle sticks, but do not line it up. Do this for a second.
- You’ll continue until your vertical popsicle stick is covered with off centered alternating popsicle sticks. Let it dry.
- Flip your “canvas” over and glue two more popsicle sticks to the top.
- Paint dark blue paint at the top.
- Moving fast paint regular blue beneath it, making sure you blend.
- Now using purple paint, blend the blue and purple paint and add more purple paint further down.
- Do the same with the pink paint. You should have 3 blank popsicle sticks when you’re done.
- Paint the remaining 3 popsicle sticks black.
- Now time to add background trees. Paint a line.
- Dab paint at the top and move down just dabbing black paint to form your tree. You’ll be making a cone shape.
- Do this from left to right of your canvas covering the entire horizon in small trees. Allow the black paint to dry.
- Now draw 4 long vertical lines from the top to bottom using black paint. You can do 3 on the left side and 1 of the left side or vice versa, it’s your painting.
- Start adding some leaves by dabbing the black paint.
- Draw some branches.
- Add more leaves until your trees look good to you.
- Do this for the other side as well.
- Let’s draw the tent. Using a lighter gray make a triangle.
- Now add two lines and a diagonal using a darker gray.
- Paint in the majority of the tent with a darker gray and the the triangle with a lighter gray. Make a black line down the triangle.
- Fire time! Dab red paint onto your popsicle stick canvas.
- Now dab orange over the red.
- Use yellow to dab over the orange. Repeat 1 more time for all colors.
- Let’s add some highlights. Using orange and a little yellow, paint down each side of the large trees facing the fire.
- Drag your fingers down to smudge it and make it less opaque.
- It’s time to add highlights around the fire and tent now.
- Paint a little orange all around the fire. Smudge with your finger to make it less opaque. Now do it for the horizon around the fire. Make sure you smudge!
- Add some streaks on the front of the tent and smudge those as well.
- Add a very light layer of white paint to a paint brush. Flick the white paint onto the sky. Once the paint brush is almost dry, gently dab the tips of the bristles onto areas between the trees.
- While your painting is drying, cut about 10-12 inches of twine.
- Flip your painting over when dry and hot glue about 1/2-1 inch of twine to the popsicle stick on the sides.
- Hang on your wall and admire your art!
More Camping Fun From Kids Activities Blog
How did your camping themed popsicle stick art turn out?