School-aged kids will learn how to use a ruler and grid to enlarge a drawing in this easy project. Our grid drawing techniques can easily be used at home or in the classroom.

Using a gRID
Many artists use a grid when creating art. By breaking down an image into a grid, artists can focus on one portion of the drawing at a time. This is a wonderful method to help kids build confidence in their skills as they tackle complicated images one grid square at a time. This project goes a step further by also changing the size of the image being drawn.
Related: View our lesson on using the grid method without enlargement.
Supplies Needed to Make this Grid Art with Enlargement Art Project

- Image – we used a 4×6 inch postcard
- Watercolor Paper – measuring desired size of the enlarged image
- Clear Plastic Sleeve – to hold image for grid drawing
- Permanent Marker – fine tip
- Ruler
- Pencil
- Watercolor Paints
- Paintbrushes
- Water
- Paper Towels
Directions to Make Grid Art with Enlargement
Step 1

With image in sleeve, use a ruler and fine-tip permanent marker to draw evenly spaced vertical lines on the sleeve. For simplicity, we chose to work in one inch increments.
Step 2

Next, use the ruler and permanent marker to draw evenly spaced horizontal lines across the sleeve. Use the same measurements as in step 1 to complete the square grid.
Step 3

On a blank piece of watercolor paper, use a ruler and pencil to create an enlarged grid. For a simplified enlarged grid, we just doubled our grid size. Meaning, on our paper, we drew 2 inch grid squares rather than the one inch grid we used in steps 1 and 2. This grid will enlarge our total image size from a 4×6 to a 8×12. Tip: Draw lightly because these lines will be erased in a later step.
Step 4

Using a pencil, lightly sketch design onto the paper using grid lines for size and placement. Focus on one square at a time to ensure the drawing looks like the square in the image grid.
Step 5

Then, use the permanent marker to trace over final drawing. Erase unwanted grid and pencil sketch lines.
Step 6

Finally, add watercolor and finishing touches to complete the project.
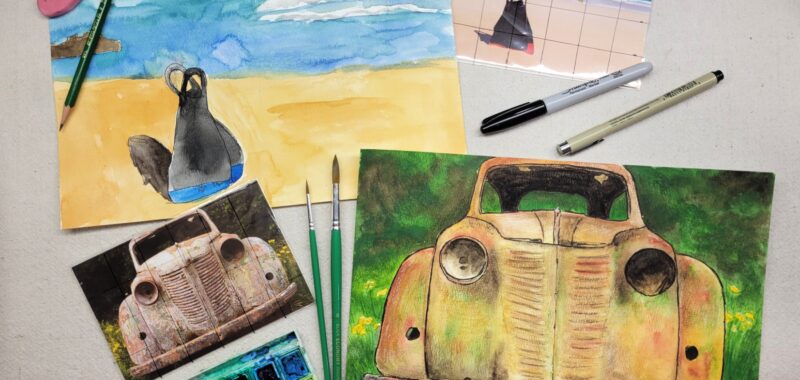
Finished Grid Art With Enlargement Art Project

I love these completed paintings! Since these projects are made on paper, they are easily framed, clipped, or displayed in your preferred style.
Our Experience Making this Grid Art with Enlargement Art Project
While our paintings are not perfect enlargements of the images, we now have a better understanding of altering an image’s size by using the grid technique. We also can break down art into smaller sections and see how easily our eyes can deceive us when we’re attempting to draw something freehand.
I enjoy using this lesson to teach students that they too can draw complex art. It is easy to become overwhelmed by details and begin to think that an image is too complicated to recreate. By focusing on one square at a time, artists slowly piece together a detailed work of art to further develop their skills and techniques.
Plus, I like that this lesson provides kids a refresher course on using a ruler and practicing their math skills!
Prep Time
5 minutes
Active Time
45 minutes
Total Time
50 minutes
Difficulty
Medium
Estimated Cost
Less than $5
Materials
- Image – we used a 4×6 inch postcard
- Watercolor Paper – measuring desired size of the enlarged image
- Clear Plastic Sleeve – to hold image for grid drawing
Tools
- Permanent Marker – fine tip
- Ruler
- Pencil
- Watercolor Paints
- Paintbrushes
- Water
- Paper Towels
Instructions
- With image in sleeve, use a ruler and fine-tip permanent marker to draw evenly spaced vertical lines on the sleeve. For simplicity, we chose to work in one inch increments.
- Use the ruler and permanent marker to draw evenly spaced horizontal lines across the sleeve. Use the same measurements as in step 1 to complete the square grid.
- On a blank piece of watercolor paper, use a ruler and pencil to create an enlarged grid. For a simplified enlarged grid, we just doubled our grid size. Meaning, on our paper, we drew 2 inch grid squares rather than the one inch grid we used in steps 1 and 2. This grid will enlarge our total image size from a 4×6 to a 8×12. Tip: Draw lightly because these lines will be erased in a later step.
- Use a pencil to lightly sketch design onto the paper. Use grid lines for size and placement. Focus on one square at a time to ensure the drawing looks like the square in the image grid.
- Use the permanent marker to trace over final drawing. Erase unwanted grid and pencil sketch lines.
- Add watercolor and finishing touches to complete the project.
Notes
Grid Art Variations
- Use other paper styles and mediums to create art with colored pencils, markers, acrylic paints, etc.
- Use clear sheet protectors to create larger grids.
- Use larger grid squares when creating work from larger images.
- Kids can reuse their plastic sleeve grid for future art projects.
- Instead of sleeves, use another type of sturdy clear surface for grid drawing.
- Practice reducing an image by using a smaller grid on drawing paper than that used on the original image.
Other Fun Watercolor Art Projects from Kids Activities Blog
Did your kids enjoy creating art using the grid method? What image did they draw?