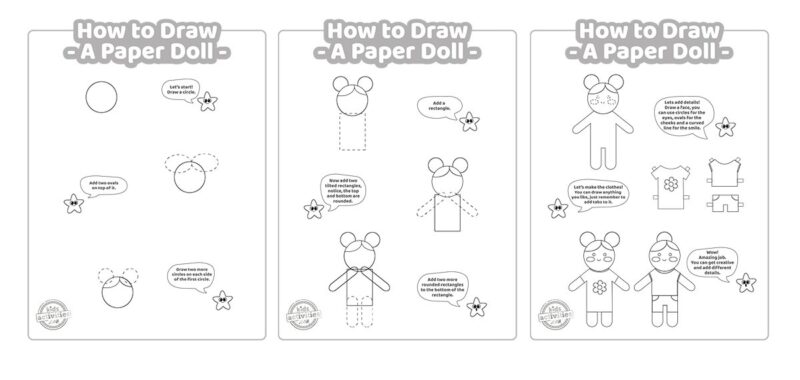
Today we are making our own paper dolls with our how to draw paper dolls tutorial! Grab your paper crafts, black marker or pencil, and get ready for some creative drawing fun!

MAKE A PAPER DOLL DRAWING
Little girls and little boys will love this easy step by step tutorial to draw unique paper dolls. A doll drawing is so much fun, and kids can make it anywhere and that doesn’t require much prep (just download the PDF files to get our free printable paper dolls tutorial and follow the instructions). They can draw your own family members or create a completely original doll! Click the green button to download and print this paper doll drawing tutorial:
To draw your own dolls, you will need white paper (or any piece of paper), a pencil, and our paper doll template tutorial. That’s it! You can get other materials if you want to get more creative.
After kids are done drawing their dolls, they can add any important details such as hair, different clothes, etc., then they can cut and paste them on card stock and use a glue stick to stick them on a popsicle stick. Now it’s time for creative play!
But before that, let’s move on to the step drawing tutorial.
6 Steps for Drawing a Paper Doll

Step 1: The first thing is to draw a simple circle. We are starting with the doll’s head.
Step 2: Add two ovals on top of it – this will be our doll’s hair!
Step 3: Draw two more circles on each side of the first circles to continue with the hair.

Step 4: Draw a rectangle to make our doll’s body. Can you see our drawing finally looking like a doll?
Step 5: Let’s draw two tilted rectangles but make sure that the top and bottom parts are a bit rounded; these will be the arms.
Step 6: Now for the legs! Draw two more rectangles to the bottom of the big rectangle, and make sure they are a bit rounded too.

Step 7: Now it’s time for details like facial features, you can use circles for the eyes, ovals for the cheeks, and a curved line for the smile.
Step 8: It’s time for the fun part: clothes! You can draw anything you like such as dresses, shirts, skirts, blouses and shorts. But it’s very important that you add tabs so you can put the clothes on your doll later.
Step 9: Well done! Your doll drawing is fine. Get creative and add different details, and make as many paper doll drawings as you want.
Download PDF file here for drawing tutorial
Need supplies for Drawing? Here are some kid favorites
This post contains affiliate links.
HERE ARE SO MANY MORE HOW TO DRAW TUTORIALS – ALL FREE!
MORE PAPER DOLL PRINTABLE PAPER CRAFTS FROM KIDS ACTIVITIES BLOG
How did your paper doll drawings turn out?

