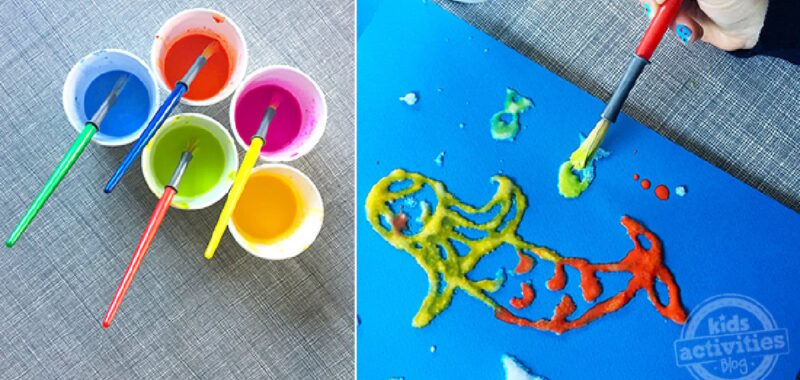
Today we have the coolest salt painting art project that works great for kids of all ages to make the most colorful, magical and 3D artwork using glue, salt and watercolor paints. This salt on watercolor art project works great at home or in the classroom. It makes a great STEM project too!

Salt Painting for Kids
Make a beautiful piece of art with a lot of salt, glue, and paint! This salt art project is great for kids of all ages whether you have younger kids or older kids. You can make a simple picture that much cooler using lots of salt!
Not only is this an easy way to keep your kids busy, but it’s great fine motor skills practice as well! This salt painting for kids is such a fun idea. Just follow our step-by-step instructions to make an awesome picture! This salt painting activity is great, a fun activity, and you will have so much fun!
This article contains affiliate links.
Related: Easy Tree Painting for Kids Using Pine Needles.
Watch Our Short Video Tutorial on Making Salt and Watercolor Art
Art Supplies Needed for Salt Art
Lay your paper on an oilcloth, newspaper or baking tray, to minimize cleanup later!!
Steps to Making Salt and Watercolor Art

Step 1 – Draw Your Picture
Molly wanted to draw a glue picture instead of go wild with shapes and patterns, so she decided to practice her character first…. introducing ‘Hat Man’
The impression of the pencil drawing came through to the page underneath so she used this to go over with the glue.

Step 2 – Squeeze Glue Over Picture Outline
I made a mistake here by giving her a paint brush and glue pot – the results would be SO much better if I had a small glue squeeze bottle for her to simply drip the paint over the lines.

Step 3 – Sprinkle Salt on Glue Liberally
Grab the table salt and sprinkle sprinkle sprinkle – be generous!
Once all the glue is covered with salt lift up the page and shake off the excess.

Step 4 – Paint with Watercolor Paint
When adding watercolor paint to the salt, you only need to drop a little color in one spot and it spreads along the salt, where it stops nobody knows! – that’s the magic of salt art.

Salt Painting Craft For Kids Notes:
- So, I know there are colored glues, glues with glitter, but I would stick with white glue or clear glue for this salt art project.
- You can use really any paper like construction paper or you can use heartier paper like card stock or watercolor paper. You could even do this o n paper plates which would make this fun art project easier in some aspects.
- If you’re doing this raised salt painting you’re gonna need paint. If you want to do watercolor painting you can, but the colors will be more like pastels and less opaque without layers. If you decide to use acrylic paints then dilute it a little bit.
- I would stick with regular table salt as other salts like Celtic, sea, and Epsom salt may be too chunky.
What Happens to the Salt & Color in Salt ARt
The salt crystallizes and sparkles – it’s pretty special. Take a picture quick!
Sat art is all about the process as the pictures are not built to last.
The colors will fade a little as the painting dries and the salt will crumble and fall off the page as it dries. SO take lots of photos of your little one’s creations for their memories.
Salt Art for Kids- Our Experience With This Salt Art
Since my daughter was a preschooler, we’ve thrown ourselves head over heels into process art. We do our best to focus on the process, the fun of doing, instead of the finished artwork, although it’s absolute magic when the two come together as it did with this salt drawing turned into a salt art masterpiece!
Last weekend it was just too wet and cold to venture out so Molly got busy in the kitchen with some salt art experimenting. Here is how we made our salt art projects.
Our Experience: Now sadly this is where we say goodbye to ‘Hat Man’ as poor Molly, in her enthusiasm, let the page slip out of her hands during the shaking and it fell into the bin! very disgustedly, after all her hard work, she had to start over – mommy had to help sell that idea! SO she took the bait and had even more fun creating a pretty swimming mermaid…
Active Time
20 minutes
Total Time
20 minutes
Difficulty
easy
Estimated Cost
$0
Materials
- table salt
- craft glue
- paint – liquid watercolors or watered down poster or acrylic paint
- heavy white and colored paper
Tools
- pencil
- paintbrushes or pipettes
Instructions
- Draw your picture on a piece of paper with a pencil.
- Squeeze glue along the drawn lines of the picture until the pencil lines are covered.
- Liberally sprinkle salt over the glue until it is fully covered.
- Gently shake off the excess salt from the paper.
- Drop watercolor paint droplets onto the salt and see how the color pops and shimmers.
- Take a picture because this artwork doesn’t last for long.
More Art Projects for Kids from Kids Activities Blog
How did your salt art turn out? What picture did you paint with salt and watercolors?

