This sand casting beach craft is inspired by the sand molds you make at the beach, but you can make them at home too! Kids of all ages can participate in making unique and special keepsakes using sand as the mold for their treasures. It is the perfect summer craft idea for home, summer camp or in the classroom.

Make Sand Molds at Home
Our family vacations over the last few summers have often included a beach visit. On the beach is a tent where you can make souvenir sand molds to take home.
Related: Oh so many more beach crafts for kids
It is something that we just can’t resist! We have made starfish, whales, our feet, lizards and all sorts of fun creations.
Video Tutorial on How to Sand Cast at Home
This article contains affiliate links.
Supplies Needed to Make Sand Molds at Home
How to Make Sand Molds with Plaster of Paris
Step 1 – Make Your Moldable Sand

The first thing I did was to get a bucket full of sand. This will be your base sand. I then mixed in cooking oil. I used 1 part cooking oil for every 10 parts of sand.
For us, that was about 10 cups of sand and 1 cup of oil.
When it was mixed, it felt like the sand was a little wet and when pressed, it would hold the pressed shape.
Step 2 – Create a Flat Sand Surface for the Craft

We used round containers to make a flat surface for your beach cast craft. You will need the sand just a little deeper than the mold you are making. Our sand was about 2 1/2 inches thick.
Step 3 – Make a Mold in the Sand
We then pushed something into the sand to create a sand mold. I made the starfish with a traditional sand mold, Rhett made a whale with another one and Reid wanted to make a flying dragon with one of the toy dragons we purchased at Dollar Tree.
You can make new designs using different materials in your molding sand. Pressing your toys firmly in the loose sand will firm it up so that your mold is more precise.

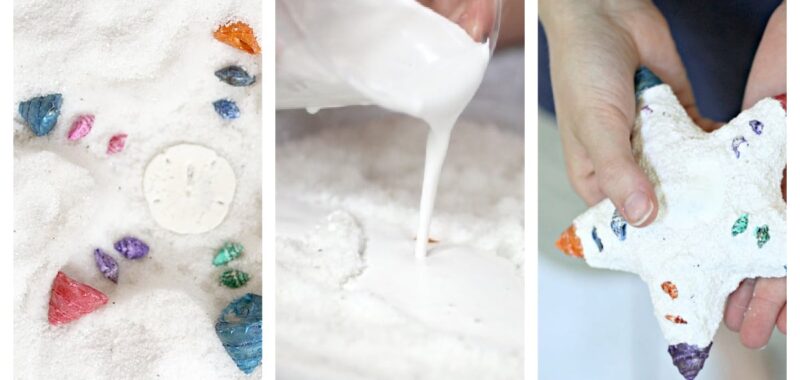
Step 4 – Decorate the Sand Strategically
The next step was to decorate the sand molds with shells or other small accessories. We used some colored sea shells and a sand dollar for the starfish shaped mold.
The trick is to place the item pretty-side down and gently push it into the sand. Using the end of a pen or pencil works great for this.

Step 5 – Make Sure Top of Mold is Level
Once the decorating is over, then make sure the lip of the mold is level. Add more sand to certain areas if necessary. You want it to go to the side of the mold.
Make Sand Casts with Plaster of Paris
Step 6 – Mix Up Plaster of Paris
I mixed up a small batch of Plaster of Paris according to the directions on the package. Please read the package directions because they may lead you to do this part without the assistance of your kids depending on their age and crafting skill level. We also put it in a pouring cup to make it easier.
You probably won’t need a lot unless you are making sand molds with a large group.

Step 7 – Pour Plaster into Your Sand Molds
We then poured the plaster mixture into the molds indented into the sand.
Step 8 – Let Plaster Set
We let them set for 1-2 hours.
If you are going to add a hanger to the back of your sand craft, then do it after about 15 minutes.
Step 9 – Remove from Sand
We are to the final step! We then lifted them out of the sand and brushed them off with a soft paint brush.
Tip: I recommend brushing off the sand outside because the sand will fly!

Sand Mold Notes:
Don’t worry about the quality of the sand. Any sand should work to make a base (though wet sand, with water, may not work as well and may result in defective castings). There are a number of types of sand, but beach sand and play sand will work as long as you follow the process of sand casting.
I will say though, if you make a casting mold or new molds using colorful sand it may change your craft. The use of sand that is colored may leave colorful grains on the final product.
Want to do a larger casting? All you need is a larger base (cake pans work great to make a bigger dry sand mold.)
You may end up with a bunch of extra material, keep it! Make more sand molds later!
Sandcasting at the Beach
It has been the same lady who helps us out each year, so this last summer I got to asking about the mechanics of making casts in the sand. This is how she does makes sand molds at the beach:
- The sand inside the elevated sandbox, has oil in it. That keeps the sand feeling “wet” and makes it easier to keep it in the molded shape while we add shells and sea glass decorations.
- When adding the shells and sea glass, you want to put it pretty side down and then push it a bit further into the sand so that the plaster doesn’t creep underneath. She uses some tools like the blunt end of a paintbrush and a rounded wooden dowel end to make sure the sand mold is ready for the plaster.
- Once it is ready, she would pour the plaster concoction into the sand and ask us to return in 1-2 hours for the final product.

Making Sand Molds at Home
This sand mold craft is such a clever and cool way to make beautiful beach art. Use shells, faux gems, sequins, rocks, beads to make lovely ocean art. This sand mold craft is great for kids of all ages: toddlers, preschoolers, and kindergarten kids along with elementary aged kids will be able to make this sand mold craft. And it’s fairly budget-friendly as well.
Our Experience Making Sand Molds at Home
Our sand molds cost a fraction to make at home than making just one does on vacation. Although my kitchen doesn’t have an ocean breeze, it was a really fun summer project to do with the kids!
Prep Time
20 minutes
Active Time
20 minutes
Total Time
40 minutes
Difficulty
Medium
Estimated Cost
$5
Materials
- 1 part cooking oil
- 10 parts sand (we used play sand)
- Sand treasures: shells, sea glass (or craft gems), sand dollars, small starfish or anything else
- Plaster of Paris
- Water
- (Optional)wire loop for hanging
Tools
- Flat container for the sand a little deeper than the sand mold
- Sand molds, sand toys or toys
- Pencil or craft stick to push down the mold decorations
- Large cup or measuring cup
- Paint brush
Instructions
- Mix up the sand you will use for the sand casting: One part cooking oil to 10 parts sand. Mix well until the sand feels slightly damp when pressed and will hold a shape indention.
- Place sand in a flat container deeper than the mold you are using – ours was about 2 1/2 inches deep.
- Push a sand toy, sand mold or toy into the flat sand and make a mold.
- Decorate the indentation in the sand with shells or other beachy accessories.
- Make sure the top of the sand mold is level. Use a craft stick or spoon to arrange sand if it is not.
- Mix up Plaster of Paris according to the directions.
- Pour the Plaster of Paris into your sand molds.
- Let the plaster set for 1-2 hours (if you want to add a wire to hang the eventual craft, add that 15 minutes into the drying process).
- Remove the hardened plaster from the sand.
- Brush off the excess sand with a soft paint brush (outside).
More Beach Crafts & sand Crafts from Kids Activities Blog
How did your sand mold crafts turn out? Did the kids have fun sand casting at home instead of the beach?