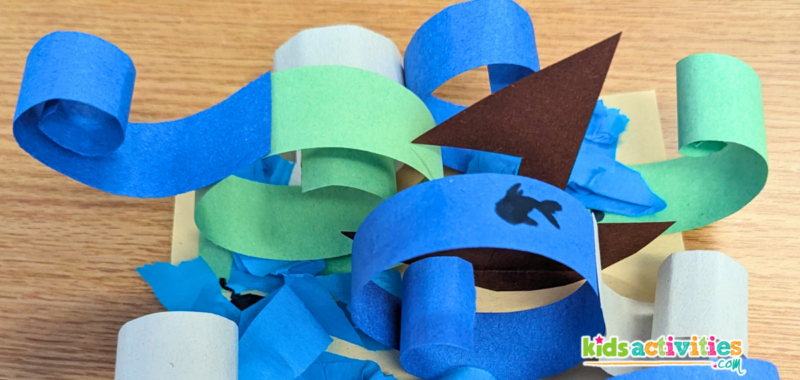
Lets make a sculpture art project of ocean waves and learn a little bit of art history with a famous Japanese artwork! This activity is good for kids ages 4-12 in a classroom setting or at home. It can help them develop fine motor skills but it is also a great learning opportunity to learn about a famous art, different mediums and techniques to make their art and be creative!

The great Wave paper sculpture art project
This is a great art project to try with your kids to be creative, work on their fine motor skills, and learn some valuable art history lessons from one of the most famous artworks there is! The artwork we will be learning about today is a print called “Under the Wave off Kanagawa” or “The Great Wave” made by the artist, Katsushika Hokusai. With this art project kids can learn about this famous piece and create a memorable paper sculpture to represent the famous artwork.
Related: Learn more about Katsushika Hokusai’s “The Great Wave” from the The Metropolitan Museum of Art!
Not only will kids learn about this famous artwork, but this ocean art helps kids to work on their fine motor skills by rolling up paper strips to make it curly like a wave. While this can be tricky for younger kids, it is a great activity to help with their development and patience. Most of all this art project allows for lots of creativity and it is super fun to make! Once the art project is complete they will learn that the curly paper waves have a lot of movement. The waves will bounce and sway as you hold this sculpture which adds an extra cool element!
This article includes affiliated links.
What you will need for ocean Art Project

You can Use this printout and cut it out to make a 3D paper boat for this art project
Another tricky part of this art project is drawing and cutting out a boat, so I made this printout you can give to your kids so they can easily cut out a boat. At the bottom there is a tab to fold and glue down so their boat will stand upright in the water amongst the great big waves!
how to make this wave art history project
Cut Paper strips and a boat from paper

To start this art project, make several long strips of blue, white, and green paper that you can turn into waves later. Then, draw and cut out a paper boat with a tab at the bottom to fold. Make sure the tab is big enough that it will hold up the boat when it is glued down to the paper. You can always use a bit of cardstock paper to help make it a bit sturdier too!
Roll up the paper strips, then glue everything on

Now take all of the paper strip, and roll them up all the way. You can use a pencil or straw to help roll them up if its too tricky. Once they are all rolled up they should be curly and bouncy! Glue on the waves in whatever shape or pattern you prefer. With the paper boat, fold the tab, and glue the bottom of the tab down.
Decorate your paper wave sculpture!

The last step of this art project is to add any extra decorations that you would like! You can draw fish, add details to the boat, make a mountain for the background, and more. A lot of kids decided to add blue tissue paper at the bottom of their ocean art project to make the water texture pop! With this part of your art you can get creative and make it your very own unique sculpture.
This is Our wave sculpture art project

Here is an example of what your artwork could look like. Most of the kids found it was easier to roll up the paper with pencils and straws. Other kids folded the paper and it created a really cool geometric look to the waves. The set up and clean up was a breeze with this art project and I loved teaching them about the artwork that inspired this fun art activity. This by far has to be my favorite ocean art project from summer camp. Making these were so fun and everyone learned a lot about art history at camp, even me and the other camp counselors learned something interesting about this famous artwork!
Active Time
30 minutes
Difficulty
easy
Estimated Cost
$1
Tools
- – Markers
- – Scissors
- – Glue
Instructions
- Cut blue green and white paper strips and cut out a boat with a tab at the bottom so it can stand upright. Add extra paper in needed to help it stand.
- Roll up the paper strips so that they are curly like waves
- Glue on the paper boat and curled paper waves to create a 3D ocean scene.
- Decorate the sculpture by drawing fish, adding details to the boat or streamers at the bottom for water!
Lets have a discussion about this artwork!
Other Educational art projects to try from kids activities blog
What did you learn about “The Great Wave”? Tell us in the comments below!

