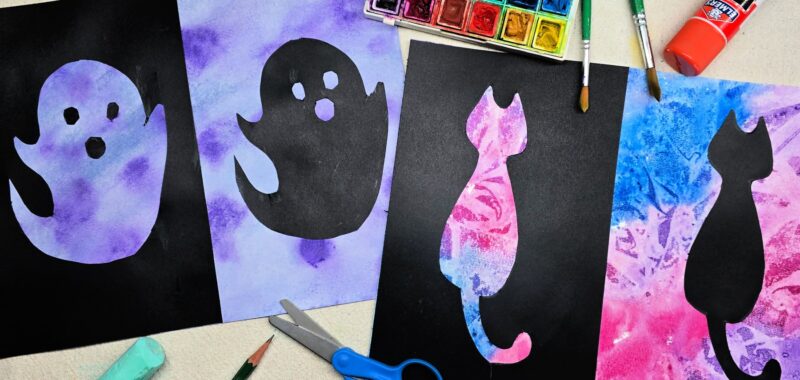
School-aged kids will learn about positive and negative shapes in this easy project. Weâve included a free printable to make this lesson easy for home or classroom use.

Positive and Negative space in Art
In art, positive space is that which contains the subject or main point of interest within the art piece. Negative space is the remaining space which surrounds the object. Artists will play with colors within these positive and negative spaces to create illusions within their art.
Related Link – Learn more about the element of space with our overlapping shapes project.
Supplies Needed to Make this Positive and Negative Spooky Shapes Art Project

- Shape Templates
- Black Cardstock – half sheet
- Watercolor Paper
- Scissors
- Chalk
- Pencil
- Glue
- Watercolor Paints
- Paintbrushes
- Water
- Paper Towels
Download the Spooky Shapes Printable Here
Use these templates to easily create positive and negative shapes.
Directions to Make Positive and Negative Spooky Shaped Art
Step 1

Use any combination of watercolor techniques to paint the entire piece of watercolor paper. Set paper aside to dry.
For this example, we applied wet paints beside one another for a fun blending technique and allowed the paper to dry while covered with crinkled plastic wrap.
Tip: To speed up the length of project by avoiding dry time, consider using markers, colored pencils, etc. to create a colorful background instead of paints.
Step 2

Use chalk to color the back of the spooky shape template.
Step 3

Place template on top of the half sheet of black cardstock and trace image using a pencil or other blunt object.
Step 4

Using one continuous cut, carefully cut black cardstock along chalk line.
Step 5

Glue black cardstock pieces to watercolor painted page, placing the chalk side down. One side of the page should appear to have black surrounding a colorful shape. The other side will show the black shadow shape of the image with a colorful surrounding.
Finished Positive and Negative Spooky Shapes Art

I love the bold colors in this fun and easy project! Since these projects are made on paper, they can easily be framed, clipped, or displayed in your preferred style for seasonal decorations.
Our Experience Making this positive and negative spooky shapes Art Project
This is such an easy project and a fun way to explore watercolor and positive and negative space. It’s interesting to see how differently we view things based on color. One on side of the artwork, the black appears to be the negative space, or background, surrounding a colorful shape. On the other side of the page, the black shadow image appears to be the focal point, creating a colorful background instead.
Prep Time
5 minutes
Active Time
20 minutes
Additional Time
30 minutes
Total Time
55 minutes
Difficulty
Medium
Estimated Cost
$1
Materials
- Shape Templates
- Black Cardstock â half sheet
- Watercolor Paper
Tools
- Watercolor Paper
- Scissors
- Chalk
- Pencil
- Glue
- Watercolor Paints
- Paintbrushes
- Water
- Paper Towels
Instructions
- Use any combination of watercolor techniques to paint the entire piece of watercolor paper. Set paper aside to dry. Tip: To speed up the length of project by avoiding dry time, consider using markers, colored pencils, etc. to create a colorful background instead of paints.
- Use chalk to color the back of the spooky shape template.
- Place template on top of the half sheet of black cardstock and trace image using a pencil or other blunt object.
- Using one continuous cut, carefully cut black cardstock along chalk line.
- Glue black cardstock pieces to watercolor painted page, placing the chalk side down. One side of the page should appear to have black surrounding a colorful shape. The other side will show the black shadow shape of the image with a colorful surrounding.
Notes
Positive and Negative Art Variations
- Use another medium for the background to eliminate paint dry time.
- Change colors and shapes to fit any holiday or season.
- Use black acrylic paint to cover positive and negative spaces instead of cardstock.
Positive and Negative Art Variations
- Use another medium for the background to eliminate paint dry time.
- Change colors and shapes to fit any holiday or season.
- Use black acrylic paint to cover positive and negative spaces instead of cardstock.
Other Fun Spooky Art Projects from Kids Activities Blog
Did your kids enjoy learning about positive and negative shapes? What template did they use for their creation?

